
每个人通过 ssh 或者本机开起一个 pts 写命令,想知道别个在做什么。之前一直不清楚要如何做,今天终于知道如何从任意一个root 用户获取别人未退出的终端的数据。
获取别人历史命令信息
gdb -p 7878 -batch -ex 'call (int)write_history("/tmp/stolen_history.txt")' -ex 'detach' -ex 'quit'
上面的 7878 是别人的 pts 进程 id 。可以能过 w 看 ip 找到对应的人的 pts ,再获取他的 pts 的 pid ,然后执行一下上面的命令就可以偷到别人的操作命令了,非常的无耻。大家千万要抵制这种偷窥的行为。。。
其它相关的命令:
# 查看当前 pts 的进程 id
echo $$
# 查看所有的 pts 进程创建的子进程
ps -ef|grep pts
# 查看当前的 tty 对应的设备符号名
tty
# 查看一个用户的创建的 bash 进程有哪些
pgrep -u root -a bash
# 查看当前 pts 的所有进程
ps -t $(tty | sed 's:/dev/::')
结果如下:
# root 的所有进程
root@localhost:~# pgrep -u root -a bash
3730 /bin/bash
6773 /bin/bash
7878 /bin/bash
8399 /bin/bash
13426 bash
39309 /bin/bash
89475 bash --rcfile /root/.bashrc.1

# 所有的 pts
root@localhost:~# ps -ef|grep pts
root        3730    3723  0 6月24 pts/1   00:00:00 /bin/bash
root        6773    3723  0 6月24 pts/2   00:00:00 /bin/bash
root        6790    6773  0 6月24 pts/2   00:00:00 journalctl -f -u dhcpd
root        7878    3723  0 6月24 pts/3   00:00:00 /bin/bash
root        8399    3723  0 6月24 pts/0   00:00:00 /bin/bash
uos        13240   13233  0 6月27 pts/4   00:00:00 /bin/bash
root       13417   13240  0 6月27 pts/4   00:00:00 su
root       13426   13417  0 6月27 pts/4   00:00:00 bash
root       39309    3723  0 09:27 pts/5    00:00:00 /bin/bash
root       89474   89472  0 09:46 ?        00:00:00 sshd: root@pts/6
root       89475   89474  0 09:46 pts/6    00:00:00 bash --rcfile /root/.bashrc.1
root       90884   89475  0 10:51 pts/6    00:00:00 ps -ef
root       90885   89475  0 10:51 pts/6    00:00:00 grep --color pts

root@localhost:~# w
 10:53:38 up 20 days, 22:57,  3 users,  load average: 0.04, 0.05, 0.02
USER     TTY      FROM             LOGIN@   IDLE   JCPU   PCPU WHAT
root     tty1     :0               246月25 20days  6:09   6:09  /usr/libexec/Xorg -background none :0 -seat seat0 -auth /run/lightdm/root/:0
uos      tty2     :1               276月25 20days 15.51s 29.27s /usr/bin/startdde
root     pts/6    10.10.74.41      09:46    0.00s  0.11s  0.00s w
可以监视别人是否登陆上来了:
watch -n 1 w
看看别人正在做什么,哇哈哈哈。
cp 有一个小细节:
cp -a source/. target/
# 或
cp -r source/. target/
# 上面两种方法会复制目录下面的 . 隐藏文件。

cp -r source/* target/
# 这种方法不会复制隐藏文件,这个细节在做系统的相关工作的时候,非常地重要。
PXE 安装失败的问题分析
TFTP (Trivial File Transfer Protocol) 是一种简单的文件传输协议,通常用于在客户端和服务器之间进行小文件传输,它基于UDP协议,使用69号端口。TFTP 相对简单,没有像FTP那样复杂的认证和交互功能,适用于客户端和服务器之间不需要复杂交互的场景,例如系统启动时获取系统镜像文件。
/etc/xinetd.d 这个是扩展互联网守护进程的配置。
mount /home/2500/uos-server-25-2500-amd64-beta2-20250528-1855.iso /var/www/html/uniontechos/
pxe 引导文件在这里:/var/lib/tftpboot ,这个能从 /etc/xinetd.d/tftp 这个配置文件当中看到。注意在使用 cp 命令拷贝系统文件时,用 -p 命令不更改文件的元数据。
root@localhost:/var/lib/tftpboot# ls
BOOTLOONGARCH.EFI  grub.cfg.bak4               syslinux-nonlinux-6.04-11.uel20.noarch.rpm
BOOTSW64.EFI       grub.cfg-v25-loongarch.bak  syslinux-nonlinux-6.04-12.uel20.01.noarch.rpm
BOOTX64.EFI        grubsw_64.efi               syslinux-nonlinux-6.04-14.uos25.noarch.rpm
EFI                grubx64.efi                 syslinux-nonlinux-6.04-6.uelc20.5.noarch.rpm
grub2              initrd.img                  theme
grubaa64.efi       ldlinux.c32                 TRANS.TBL
grub.cfg           mmx64.efi                   usr
grub.cfg-1070.bak  pxeboot                     vmlinuz
grub.cfg.bak2      pxelinux.0
grub.cfg.bak3      pxelinux.cfg
root@localhost:/var/lib/tftpboot# find . -name *.img
./pxeboot/initrd.img
./initrd.img
root@localhost:/var/lib/tftpboot/pxelinux.cfg# cat default
default uniontechos_x86
prompt 0
timeout 100
label uniontechos_x86
  kernel vmlinuz
  append initrd=initrd.img  inst.stage2=http://192.168.1.2/uniontechos inst.ks=http://192.168.1.2/ks/ks.cfg
有两个生成的 initramfs 的 img 文件。看配置用的是最外面的那个。
将其解压:
xz -d -c initrd.img > initrd.img.raw
cpio -idmv < /path/to/initrd.img.raw
cd usr/lib/udev/rules.d/
看到了报错的位置:
SUBSYSTEM=="misc", KERNEL=="sgx_enclave", GROUP="sgx", MODE="0660"
SUBSYSTEM=="misc", KERNEL=="sgx_vepc", GROUP="sgx", MODE="0660"
将这两行去掉重新打包,然后替换之前的 initrd.img ,再测试一下 PXE 的安装。
find . | cpio -o -H newc | xz -z -c > ../initrd.img
这个命令报错了。
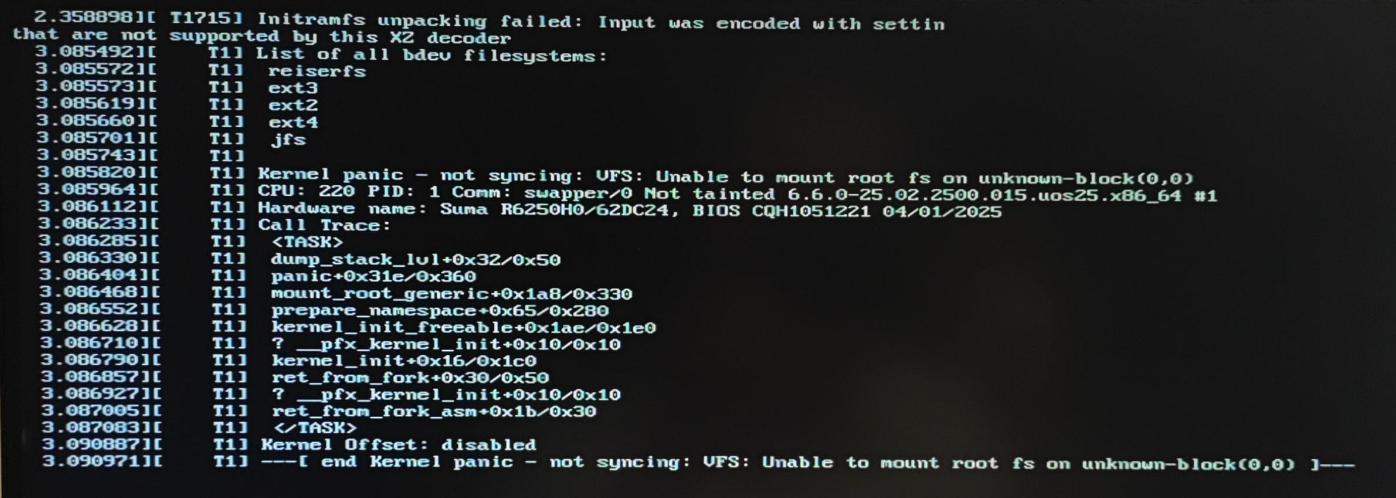
图 1: “caption”
用了系统同事的命令:
# 解压:
xz -dc initrd.img | cpio -id

# 打包:
find . | cpio -c -o | xz -9 --format=lzma > initrd.img
第二次替换:
思路,将 /var/www/html/uniontechos/images 和 /var/lib/tftpboot 的 vmlinuz 和 initrd.img 均进行替换。如果是挂的 iso,复制成文件夹解挂载。
/var/www/html/uniontechos/image 下的 install.img 删掉,然后再执行:
unsquashfs ./install.img
mksquashfs squashfs-root/ install.img -comp xz -Xbcj x86 -e boot
换用 euler 的内核测试
镜像mount后,把内容全部复制到 var/www/html/uniontechos 这个目录下面。
/var/lib/tftpboot/目录下面的vmlinuz和initrd.img换成是euler的。
把/var/lib/tftp下的grub.cfg 改成 euler iso 下的。
测试有报错。这条路走不通,感觉还是看一下 dracut-initqueue 那块的代码,看能不能加个补丁绕过一下这个问题。
dracut 代码梳理
initrd.img 解压后的目录 ./usr/lib/dracut/ 下搜一下 ifup 这个关键字。
hooks/cmdline/29-parse-livenet.sh:24:# setting netroot to "livenet:..." makes "livenetroot" get run after ifup
hooks/cmdline/96-parse-bond.sh:15:# We translate list of slaves to space-separated here to make it easier to loop over them in ifup
hooks/pre-udev/60-net-genrules.sh:74:    ifup='/sbin/ifup $name'
hooks/pre-udev/60-net-genrules.sh:76:    runcmd="RUN+=\"/sbin/initqueue --name ifup-\$name --unique --onetime $ifup\""
hooks/pre-udev/60-net-genrules.sh:99:            # The GOTO prevents us from trying to ifup the same device twice